Moveable Mandolin Chord Shapes: Major and Minor

One of the first things people buy when they purchase an instrument is one of those chord charts with 200 chords on them. You don’t want to do that, you want to understand the CONNECTIONS between each chord so you don’t have to memorize all of that stuff. Today I’m going to show you the moveable major chord shapes for mandolin and how they transform into the minor mandolin chords.
The first characteristic of a moveable chord shape is that it contains no open strings. This makes it to where you can move the shape up and down the fingerboard and it becomes multiple chords. For example, if you hold an A chord shape and move it up two frets, it becomes a B major. No need to learn a new fingering.
Start with my 7 Easy Mandolin Chords if you are just starting out
Major and Minor Mandolin Chords
I don’t want to go heavy into theory here, you might want to do some supplemental theory reading after going through this. In short, the only difference between a major and a minor chord is one note. A note that moves down a fret on the instrument. Understanding this will help you connect the dots much better. Let’s look at the first major to minor chord transformation
Major Chord Shape #1 for Mandolin
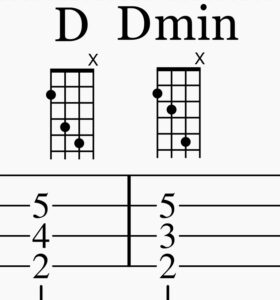
You will make this chord by using your INDEX finger on the 2nd fret of the 4th string.
The RING finger catches the 4th fret of the 3rd string and the PINKY catches the 5th fret of the 2nd string. The first string is X’d out, meaning you try not to hit it or you can deaden that string with a portion of your index finger, so if you do accidentally hit it, it doesn’t make a tone.
This particular chord is a D major chord. What you want to memorize is where the D note (or ROOT note) of the chord is. You are playing it with your pinky.
If you’d like to play an E major chord, you simply move it up two frets. Want to play an F major? Move it up another fret and so forth. If you move this D major chord down two frets to where the 4th string is now open, you might recognize it from my simple mandolin chords. It’s your Simple C major chord!
Now let’s look at the minor chord. The only different is now instead of using your ring finger on the 4th fret of the 3rd string, you bring your middle finger in to the 3rd fret of the 3rd string. Notice the difference in sound. I recommend moving back and forth between the major and minor a bunch of times to get used to this. Just like with the major chord, this chord shape is moveable. Want an E minor? Move it up two frets. Try to find a G minor with this chord shape.
Major Chord Shape #2 For Mandolin

What’s really nice about mandolin is there are some symmetries. For example, if you learn a G major scale, you can move the same fingering over a set of strings and play a D major scale. This apples to our chords as well.
Notice that the fingering for the 1st, 2nd, and 3rd strings are the same as the chord above, just moved over a set of strings. The only difference here is you’ve added an extra note on the 4th string. How do we catch all of these notes? You barre across the 2nd fret with your index finger. Try to catch both the 4th and 3rd strings with that index finger, it might take a bit of pressure at first.
In the case of this chord, your A note or root is now on the 4th string. Want to make a B major chord? Just move the A major chord here up two frets. Move it up one more fret to play a C major. If you move it down two frets to where it contains the open 4th string, it is now your SIMPLE G MAJOR chord.
For the minor, all you need to do once again is instead of using your ring finger, use your middle finger on the 3rd fret of the 2nd string.
It’s quite amazing, with these four chord shapes, you’ve already learned a bucket full of chords! All you need to remember is what to change between the shapes from major and minor. You also need to know the SERIES OF NOTES (how many steps there are between G and A….or B and C).
Major Chord Shape #3 For Mandolin

This tends to be the chord shape students struggle with the most of the three. This one has no relation to the other two as far as the fingering.
You will barre the first three strings at the 2nd fret. It’s okay if your barre catches the 1st string because you’ll be fretting it higher with another finger.
Your middle finger plays the 4th fret of the 4th string. Your ring finger plays the 4th fret of the 1st string. This is an E major chord.
With this chord, the E note or ROOT is on the 3rd string. I’ll repeat myself-For each chord shape, memorize where the ROOT is, you need to know this.
To get the Eminor, you’ll need to change your fingers quite a bit unfortunately. Move your middle finger to the 3rd fret of the 1st string. Your ring finger moves to the 4th fret of the 4th string.
Practice moving from this E major to E minor (This is more difficult than the previous ones).
Closing Words
There are other chord shapes, but these will hold you for awhile. You can take these three chord shapes and play any major chord you might need to play (as well as minor).
Once you get the hang of this major to minor changing, try to do something like this:
A major to E major
E major to A major.
Assignments:
- Find F minor for each of the three shapes
- Try to play an D minor to A major chord change.
